
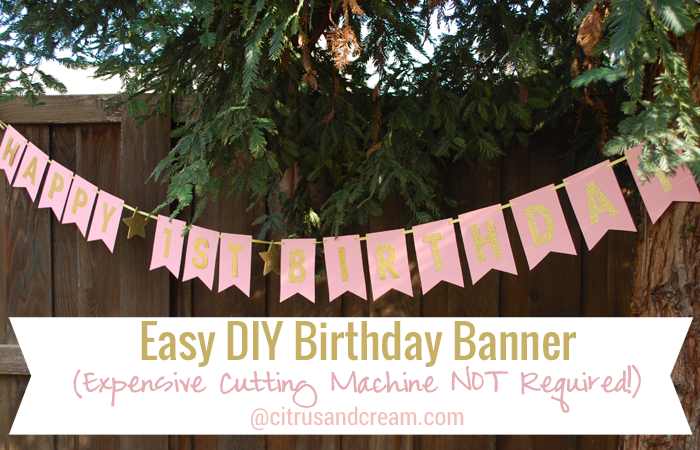
Today I’m sharing with you this easy DIY birthday banner that I made. This month my youngest daughter turned one, and first birthdays are a big deal in our house! Not only because we get to celebrate the life our sweet girl with all of our closest friends and family, but also because we as parents made it through the first year! The lack of sleep, constant diaper changes, early morning feedings, and all the in between–we did it. So as the big day approached, I went into party planning mode and decided to make quite a few of the details for her party myself.
I always seem to go back and forth on the birthday banner: one party I’ll make it, the next I’ll buy it, and this time I browsed Etsy to see if something fit the theme. I found a few that I liked but just couldn’t bring myself to spend $25-$30 on a custom banner. So naturally, I decided to try and make it! It was easy and required only a few materials. But most importantly, you don’t need an expensive cutting machine (Silhouette or Cricut), or even an Exacto knife for that matter.
 Materials:
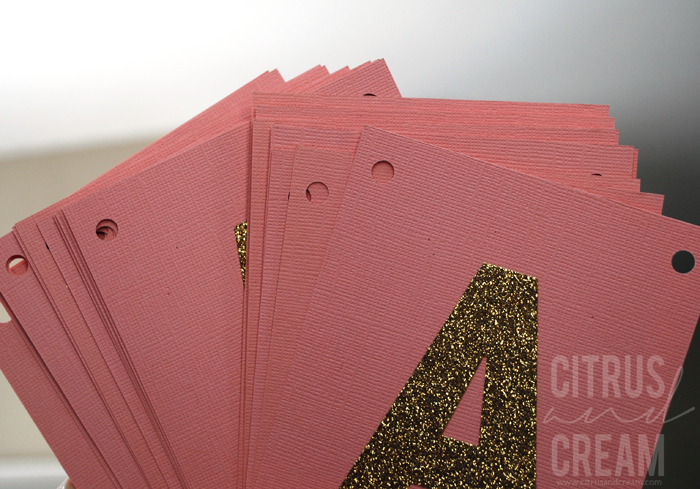
12″ x 12″ Cardstock (each piece of cardstock yields six pennants, so plan accordingly)
Sticker Letters
String
Hole Punch
Scissors
Simple Craft Paper Cutter
Cutting Mat with Grids (makes it much easier but not necessary)
Ruler
A note about the materials: The sticker letters were purchased from JoAnn. Each letter measures about 2.5 inches x 3.5 inches. If the letters you purchase are different, make sure they will fit on the 4 x 5 pennant before cutting. The stickers were on sale for $4.99 and contained a few of each letter and numbers. (Double check to make sure you have enough letters.) I actually had to cut and paste to make one additional ‘D’. The Simple Craft Paper Cutter can also be purchased at any craft store. Take a coupon with you if you don’t have one since they run between $10 and $20 regularly. The Cutting Mat with Grid makes measuring and drawing your lines easier and can often be purchased in a kit with a ruler.

First, cut the small barcode section of the paper off. This is in addition to the 12×12 cardstock, so after you cut, your paper should be exactly 12x 12. Then cut it again in half leaving you with 2 pieces, each 6 x 12 inches.
Next, you are going to lightly draw out your lines. These lines will guide you to create to bottom ^ part of the pendant. Turn your paper over if there is a right and wrong side so that you are drawing on the wrong side. Measure up 1 inch from the bottom and draw a line lightly across. Make sure you don’t push into the paper with your pencil. You don’t want it to emboss through to the other side! (See figure below.)
Now draw 3 small perpendicular lines at the 2, 6, and 10 inch mark. This gives you a point to cut into. You could skip these steps and lay your ruler down 1 inch up, then draw a mark at the three points above; however, having the X helps me visualize while cutting.
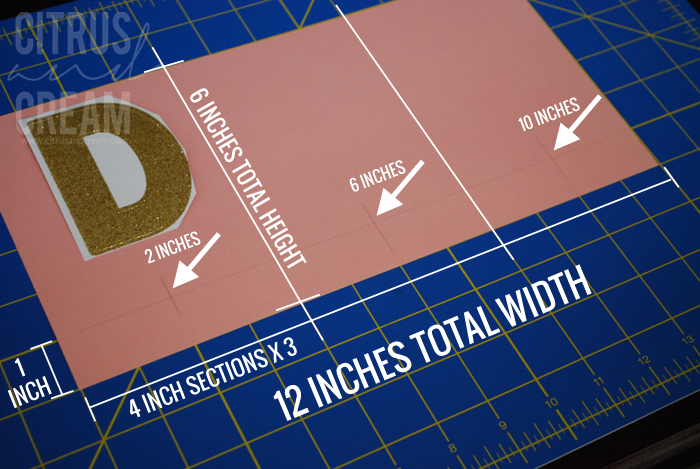
After you have everything marked, use your paper trimmer to cut every 4 inches or at the 4 and 8 inch marks. You should now have three 4 inch wide by 6 inch tall pieces. These are your pennants. Continue doing this until all of your pieces are marked and cut.
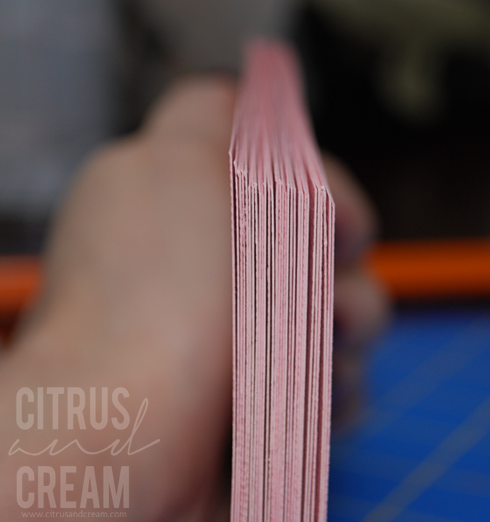
I cut 5 whole pieces and ended up with 30 pennant pieces. The cutting process is never perfect for me, and that’s ok. I only needed 25 so I lined them up widest to least widest, then removed the 5 that were the most off.
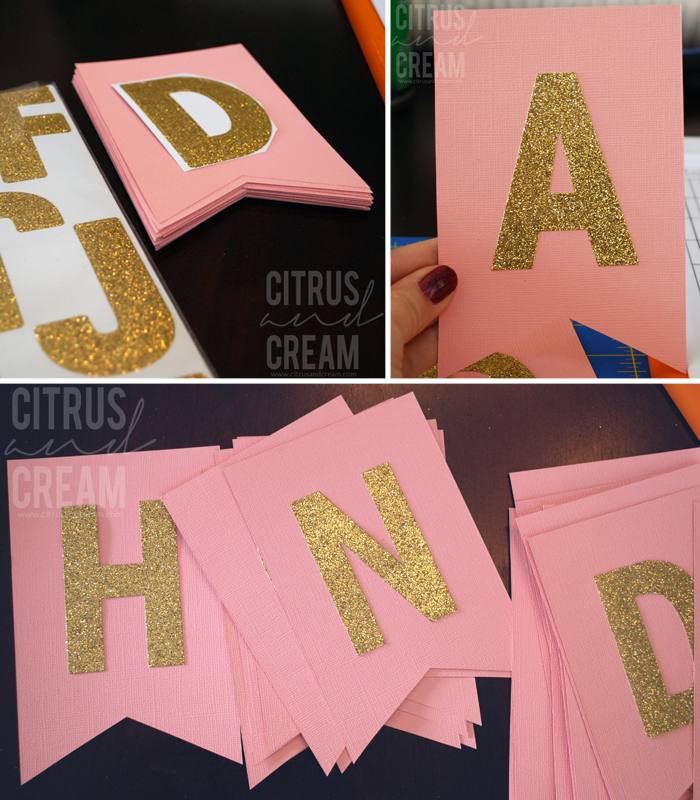
Next you will need your scissors to make your ^ at the bottom of the pennant. Simply cut from one corner into the cross section that we drew out, then from the other corner. Again, it doesn’t have to be perfect, but it’s a small cut so a straight line shouldn’t be too difficult.


Now stick or glue your letters to you pennants. I just eyeballed mine and tried to make them centered all the way around.
Almost done! Use a hole punch to punch a hole on both upper corners of every pennant.
String your pennants and secure with tape on the backside if needed.

Paper- 5 for $1 on sale at JoAnn x 2 = $2
Sticker Letters on sale at JoAnn = $5
String or Ribbon = $0 (left over)
All other materials = $0 (already owned)
I love this banner Steph! So cute.
Me too! It may be one of my favorite handmade banners yet 🙂
Thank you so much for posting this it was so helpful for my daughter’s fourth birthday party! The cheapest I found to buy one was from Vistaprint at $9 plus shipping ($6). I am going to try to have my daughter help me make it as a craft for us. I already have most of the supplies so this will be free for us! It will make the party decorations extra special. Again, I really appreciate you sharing this information for free, for those of us stay at home moms on a budget that want to make our children’s party beautiful!
You are welcome! I am glad you found it useful and are going to make something fun and special for your daughter, we loved ours!
I made this for my daughters first birthday as well! A lot of cutting but it was fairly easy once I got a rhythm down. (:
So glad it worked out for you, Lila! Thanks for sharing!
Awesome Lila, yes- it’s a bit of cutting, but seems to go quickly 🙂
Hi been looking to buy the letters where can I get them from?
Kelly, these were from JoAnn, and they still carry something. Michael’s would likely work, as well as any other craft store. If you don’t have one near you, another option is a teacher supply store – the letters that are normally used for bulletins would work perfectly! Just make sure you get the right size, and look for the adhesive-backed ones if possible. Hope this helps!
Amazon carries the brand as well- mambiSTICKS Themed Stickers, Upper Case Alphabet and Numbers, Gold Glitter
Just wondering where did you get the gold stars from
Hi Kelly- the stars were purchased from Joann’s they also have them on Amazon, here . Then I sprayed them with Rust-Oleum Glitter Spray, Gold
Thank you for posting! Great tutorial and exactly what I was looking for.
You’re welcome! Glad it helped!
How can I make the letters with glitter? Can’t find the sticker letters where I live 🙁
Thank you so much for this excellent tutorial. I just made mine last week for my son’s first outdoor birthday picnic and I couldn’t believe how fast I was able to make it.
Great! So glad it worked for you!
Thank you very for the instruction, so clear and make the work much easier. I just follow the step and finished the cardstock cutting, now is waiting for the letter shipped from Amazon. Love the way you mentioned where to get all the materials, thank you again!
Awesome! You’re welcome- I always appreciate not having to track down the materials as well. With those letters that I used I would recommend adding a touch of glue to the back side. My paper was textured and by the end of the party the letters were starting to pop off. 🙂
How long is the whole banner once put together?
Hi Karla, it’s hard to say- it depends on the number of pendants you’re using and how spaced out they are- I made mine two rows.
Should I Be Picking up thick string so the letter stay in Place,
Going to Try this for my Son’s First Birthday
I just finished making mine just have to hole punch them and hangs them up. I used construction paper because that’s what I had and it worked just as great. I got my stickers from Dollarama.